

Tile Calculator
Estimate how many tiles you need for a rectangular floor or wall using project size, tile size, grout gap, waste allowance, and optional box quantity.
Results
This estimate works best for rectangular floor or wall areas. For L-shaped rooms, niches, borders, diagonal layouts, patterned tile, or many cuts, calculate sections separately and consider a higher waste allowance.
A Tile Calculator helps you estimate how many tiles and boxes you may need for a floor, wall, backsplash, or other rectangular tiled surface.
Enter the project dimensions, tile size, grout-joint width, and any waste allowance you want to include. The calculator can estimate the base tile count, account for partial rows or columns, and convert the result into whole boxes when the number of tiles per box is known.
The result is a planning quantity. The final order can change because of cuts, layout pattern, breakage, actual tile dimensions, box packaging, and whether offcuts can be reused.
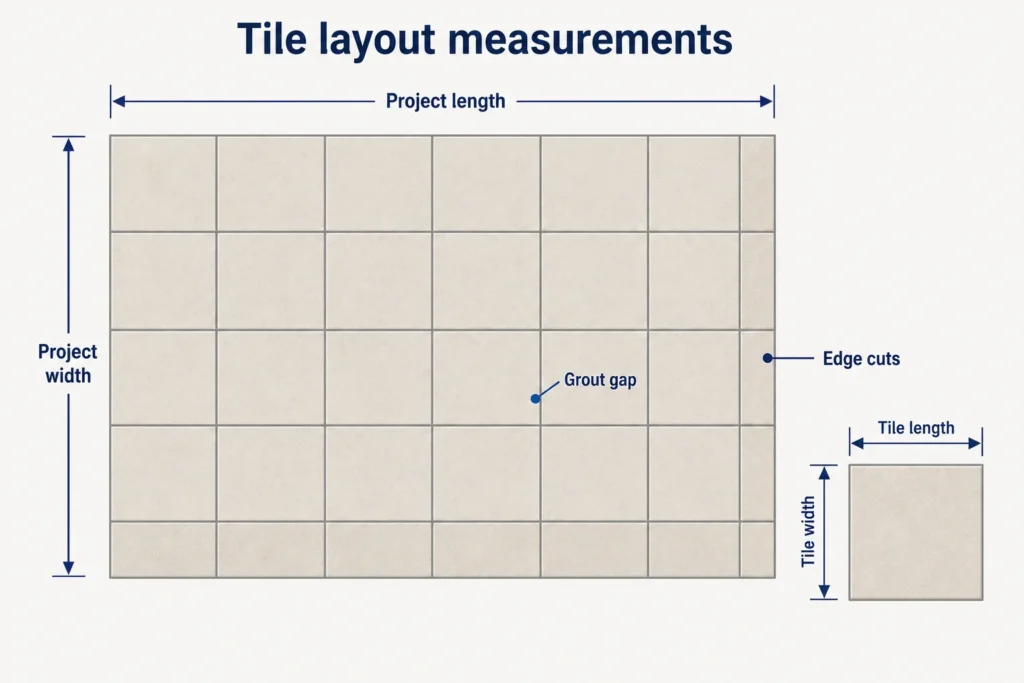
Measure the finished tiled area, use the actual tile size when available, and add waste only after the basic layout has been estimated.
Start With the Area You Will Actually Tile
Measure the finished length and width of the surface.
For a rectangular area:
Surface area = Length × Width
For example, a floor measuring:
12 ft × 10 ft
has an area of:
120 ft²
If the project contains several separate rectangular areas, calculate each one individually and add the totals.
This is usually more reliable than trying to turn an irregular room into one large estimated rectangle.
A Quick Tile Example
Suppose you are tiling a:
12 ft × 10 ft floor
using approximately:
12 in × 12 in tiles
with:
1/8 in grout joints
The project area is:
120 ft²
An area-only estimate might suggest roughly 120 one-square-foot tiles.
In practice, the final count can be different because the rows and columns must fit the room dimensions, edge tiles may need cutting, the actual tile face may not measure exactly 12 inches, and some material will normally be reserved for cuts or breakage.
That is why the Tile Calculator looks beyond area alone.
Tile Size and Grout Joint Work Together
In a straight grid layout, each repeating section consists of a tile plus a grout joint.
If a tile is:
12 in wide
and the joint is:
1/8 in
the repeating module is approximately:
12 + 0.125 = 12.125 in
However, remember that a row of several tiles has grout joints between tiles, not beyond both outside edges.
A more precise directional check is:
Number of tiles = ceiling((Project dimension + Joint width) ÷ (Tile dimension + Joint width))
The calculator can perform this automatically.
This directional method is useful because a fraction of a tile at the edge still normally requires another whole tile.
Keep All Dimensions in the Same Unit
Do not mix inches, feet, millimetres, and centimetres directly in the same formula.
For example, if the room is measured in feet but the tile and grout joint are given in inches, convert them first.
Useful conversions include:
1 ft = 12 in
and:
1 in = 25.4 mm
A 3 mm grout joint cannot simply be added to a 12-inch tile without converting one of the measurements.
Area Estimate vs Layout Estimate
There are two useful ways to think about tile quantity.
Area-Based Estimate
This divides the project area by the face area of one tile.
It provides a quick starting point.
Directional Layout Estimate
This checks how many tiles are required along the length and width of the surface, including partial rows and columns.
For a straightforward rectangular installation:
Base tile count = Tiles along length × Tiles along width
The layout method may require slightly more tile than an area-only calculation because edge cuts still consume whole pieces.
Actual Tile Size Matters
A tile sold as:
12 × 12
may not have an exact 12-inch face measurement.
The listed size may be nominal.
For a more accurate calculation, use:
- the manufacturer’s technical specification;
- the carton information; or
- an actual measured sample.
This becomes increasingly important over long runs because a small size difference repeated across many tiles can shift grout joints and edge cuts.
Nominal Size vs Actual Size
Suppose a tile marketed as 12 inches actually measures:
11 13/16 inches
If you design the entire layout assuming a true 12-inch tile, the error repeats across every row.
By the far side of a large room, the difference may be large enough to affect the final cut.
Measure first when layout precision matters.
Grout Does Not Simply “Remove” Tiles
A grout joint slightly increases the space occupied by each repeating tile module.
That can reduce the number of full tiles needed across a dimension in some cases.
But the practical quantity still depends on:
- partial edge rows;
- cut reuse;
- centering;
- pattern;
- actual tile dimensions; and
- room shape.
So grout width should be part of the layout calculation rather than treated as a simple percentage reduction in tile count.
Centering the Layout Can Change the Cuts
The smallest mathematical tile count is not always the best-looking layout.
Suppose starting with a full tile against one wall leaves a very narrow strip at the opposite side.
You may prefer to shift the starting point so both edges receive wider, more balanced cuts.
That can change how efficiently tiles are used.
Before ordering for a visible floor or wall, dry-lay or mark out at least one representative row.
Avoid Tiny Edge Pieces Where Possible
Very narrow cuts can be:
- difficult to install;
- easier to break;
- visually awkward; and
- difficult to align.
If your initial layout leaves a 1-inch strip along one wall, moving the starting line may produce two wider cuts instead.
The calculator estimates quantity, but layout decisions still require looking at the actual room.
Waste Depends on the Pattern
Not every tile layout produces the same amount of waste.
A basic straight layout in a simple rectangular room usually creates fewer cuts than a diagonal or highly patterned layout.
As a general planning concept:
| Layout / Project Condition | Expected Cut Complexity |
|---|---|
| Straight grid, simple room | Lower |
| Offset / running bond | Moderate |
| Many corners or small rooms | Moderate to higher |
| Diagonal layout | Higher |
| Herringbone | Higher |
| Borders or decorative inserts | Higher |
| Multi-size pattern | Higher |
| Niches, benches, stairs, curves | Higher |
This table is not a fixed waste-percentage rule.
The actual allowance should reflect the layout, product, room shape, installer experience, and availability of replacement tile.
Add Waste After the Base Count
Once you know the basic tile quantity, apply the selected allowance.
For example, if the base calculation gives:
120 tiles
and you choose:
10% additional material
then:
120 × 1.10 = 132 tiles
If the result is not a whole tile, round upward.
Do not round the base quantity down before adding the allowance.
Boxes Must Be Rounded Up
Tile is often sold by the box.
Suppose the final planned quantity is:
132 tiles
and each box contains:
10 tiles
Then:
132 ÷ 10 = 13.2 boxes
You cannot normally purchase 13.2 boxes, so you would need:
14 boxes
unless the supplier sells matching individual tiles separately.
This is why the calculator should estimate both tile count and full boxes.
Use the Box Information From the Actual Product
Packaging varies.
One box might contain:
8 tiles
another:
12 tiles
and another may be labeled primarily by:
square feet per carton
Use the information printed on the exact product.
If the carton states coverage in square feet rather than tile count, compare using the manufacturer’s stated coverage and confirm how partial boxes are sold.
Box Coverage and Tile Count Are Both Useful
Suppose a carton contains:
10 tiles
and each tile has a nominal face area of:
1 ft²
The carton might appear to cover:
10 ft²
But manufacturer-published coverage can reflect actual dimensions and packaging differently.
For purchasing, the carton specification is usually more reliable than reconstructing box coverage from nominal tile dimensions alone.
Large Openings Can Be Deducted
If a wall contains a large area that will definitely remain untiled, such as a major doorway or permanent opening, subtracting it can improve the estimate.
But small openings often save less material than their area suggests.
Why?
Because tiles still need to be cut around them, and the remaining pieces may not be reusable elsewhere.
For example, cutting a hole through the center of a tile does not necessarily save an entire tile.
Deduct large, clearly defined openings rather than automatically subtracting every small interruption.
Niches and Benches Need More Than Area
A shower niche may remove some wall area but add several new tiled surfaces:
- back;
- top;
- bottom;
- sides.
Likewise, a bench introduces horizontal and vertical surfaces.
These features should usually be measured as separate zones rather than deducted as simple holes.
Complex shower work is one reason area-only tile calculations can underestimate material.
Walls and Floors Can Be Combined—Sometimes
You can combine several surfaces into one order when all of them use the same:
- tile;
- orientation;
- grout joint;
- pattern;
- shade or lot;
- and waste allowance.
If the floor and wall use different tiles or orientations, calculate them separately.
Separate calculations are also useful when one surface has many more cuts than another.
Different Tile Products Should Stay Separate
Suppose a bathroom uses:
large-format floor tile
small shower wall tile
and:
mosaic accent tile
Do not combine all three into one square-foot quantity.
Each product has different:
- dimensions;
- packaging;
- waste;
- layout;
- joint size; and
- box coverage.
Treat each material as its own order.
Plan Around the Visible Centerline
For a prominent wall or floor, layout can matter more than maximizing the use of every offcut.
Find the main visible centerline or focal point.
Then dry-lay or mark a row using:
tile + grout joint
to see where the edges land.
A balanced layout may require slightly more tile but give a much cleaner finished appearance.
This is especially useful for:
- bathroom walls;
- kitchen backsplashes;
- entry floors;
- feature walls; and
- large open rooms.
Diagonal Layouts Need More Cutting
Turning tile diagonally can create a strong visual effect, but it increases cutting along the perimeter.
That usually means:
- more waste;
- more labor;
- more broken pieces; and
- greater need for layout planning.
Do not use the same minimum allowance automatically for a diagonal layout that you would use for a simple straight grid.
Herringbone and Patterned Layouts Need Extra Planning
Herringbone and multi-piece patterns can create many more cuts and alignment points.
The actual material requirement depends on:
- pattern repeat;
- room shape;
- border treatment;
- starting point;
- tile dimensions; and
- whether cut pieces can be reused.
The calculator can provide a base quantity, but the pattern layout should be reviewed before the final order.
Keep Spare Tile for Future Repairs
Tile colors, shades, and dimensions can vary between production runs.
If a tile cracks years later, the same model may be:
- discontinued;
- a slightly different shade;
- a different caliber;
- or unavailable.
Keeping a small quantity from the original lot can make future repairs much easier.
Store spare tiles where they will remain dry and protected.
Shade and Caliber Matter
Two boxes with the same product name may still have production information indicating shade or dimensional variation.
Before installation, check:
- product code;
- shade;
- caliber;
- lot;
- and manufacturer instructions.
If possible, order the required quantity at one time rather than relying on later boxes matching perfectly.
Substrate Preparation Is Separate From Quantity
The Tile Calculator tells you how much tile the dimensions may require.
It does not determine whether the surface is ready.
Installation can depend on:
- flatness;
- structural movement;
- moisture;
- waterproofing;
- substrate type;
- deflection;
- adhesive;
- grout;
- expansion or movement joints; and
- other assembly requirements.
Use the manufacturer’s instructions and relevant installation standards for the actual tile system.
Common Tile Calculation Mistakes to avoid
Dividing Area by Tile Area and Stopping There
Area provides a starting estimate, but partial rows and layout cuts can increase the practical count.
Ignoring Grout-Joint Width
The tile and grout joint together create the repeating layout module.
Using Nominal Tile Size as Exact Size
Check the actual product dimensions.
Mixing Millimetres With Inches
Convert everything to compatible units first.
Subtracting Every Small Opening
Cuts around small openings may still consume nearly the same amount of tile.
Forgetting the Pattern
Diagonal and patterned layouts usually create more cuts than a simple grid.
Rounding Boxes Down
Purchase quantities normally require full boxes.
Assuming Future Boxes Will Match
Shade, caliber, and production runs can differ.
Related Project Calculators
Use the Room Size Calculator when you need to calculate the floor or wall dimensions first.
The Flooring Calculator can help with non-tile floor materials.
For outdoor hardscape layouts, the Paver Calculator can estimate paver quantities.
FAQ
How do I calculate how many tiles I need?
Start with the surface dimensions and tile dimensions.
For a practical rectangular layout, calculate how many tiles are required along each direction, round each directional count upward, then multiply the two counts.
Add a suitable waste allowance afterward.
Does grout reduce the number of tiles?
A grout joint increases the repeating tile module slightly.
However, partial edge rows, layout choices, and cuts still determine the practical tile count.
Should I use nominal or actual tile dimensions?
Use the actual manufactured size when available.
Nominal sizes can differ slightly from the real tile face dimensions.
How much waste should I add?
There is no single percentage that fits every installation.
Simple straight layouts generally need less additional material than diagonal, herringbone, irregular, or highly cut layouts.
Should I subtract doors and openings?
Large areas that definitely will not be tiled can be deducted.
Small openings may not save much material because surrounding tiles still require cutting.
Can I combine wall and floor tile?
Only when they use the same tile, layout, joint, and ordering assumptions.
Otherwise calculate them separately.
How do I calculate boxes?
Divide the final required number of tiles by the number of tiles per box and round upward.
If the manufacturer provides coverage per box, you can also use that figure as appropriate.
Should I buy extra tile for repairs?
Keeping spare matching tile from the original production lot can be useful for future repairs, especially when exact replacement may be difficult later.
Does the calculator determine grout or adhesive quantity?
Not unless those calculations are specifically built into the tool.
Tile quantity, grout quantity, and adhesive coverage depend on different inputs.
Does the calculator tell me how to install tile?
No.
It estimates material quantity. Substrate preparation, waterproofing, movement joints, adhesive selection, grout, and installation technique require product and system guidance.
Installation Reference
For technical information about tile assemblies and installation methods, see resources from the:
Product-specific installation instructions should also be followed for the tile, setting material, grout, waterproofing, and substrate being used.
Count the Layout, Not Just the Square Feet
A Tile Calculator is most useful when it reflects how the tile will actually be laid out.
Square footage tells you how large the surface is.
The layout determines how many complete tiles, partial edge pieces, and boxes are likely to be needed.
Measure the finished surface, use the actual tile dimensions where possible, include the intended grout joint, and look at the edge cuts before choosing the final allowance.
Then round the finished requirement to the packaging the supplier actually sells.
That gives you a much more practical order than simply dividing room area by nominal tile area.